
Content
Preserving hiss-story: conserving a taxidermy snake – Royal Museums Greenwich
Aug
Discover the work involved in treating a 100-year-old puff adder – and its connection to HMS Terrible
Rachel Roberts
A look at the treatment of a taxidermy puff adder captured by the crew of HMS Terrible
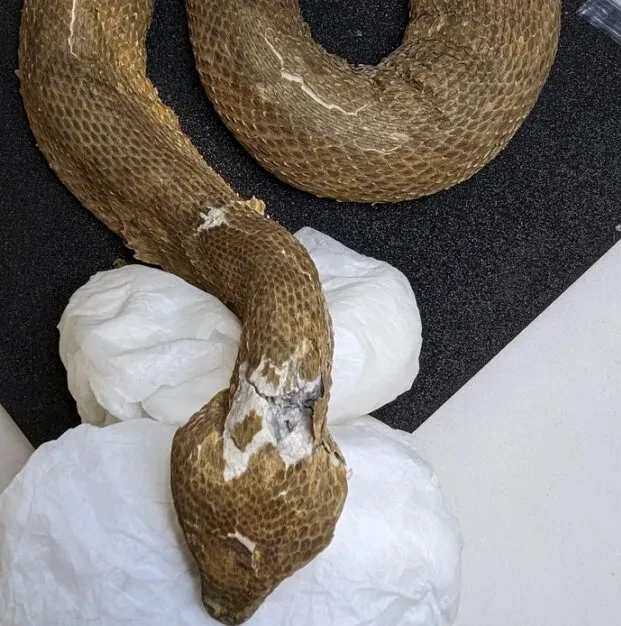
When this taxidermy puff adder came into the conservation studio at The Prince Philip Maritime Collections Centre, it had multiple problems ranging from damage to the plaster to breaks and losses in the snake skin.
The treatment called for the use of many novel or specially adapted methods and offers an exciting glimpse into the variety of objects in our collection.
The object conservation team is currently in the process of upgrading the storage of our taxidermy collection. Due to the serious condition issues that the snake presented, it was decided that conservation treatment needed to take place prior to rehousing – the process of making a storage container for an object – to make sure that the snake would not suffer any further damage.
Originally captured by the Bluejackets of HMS Terrible, one of the Powerful-class protected cruisers built in the 1890s, the snake was likely found by sailors during the Battle of Ladysmith in the Second Boer War when HMS Terrible provided relief in South Africa.
Puff adders are highly venomous vipers found across Africa and are responsible for more deaths than any other African snake species.
The only information about the object is a small card accompanying the snake which reads:
“Puff adder caught by Bluejackets from H.M.S. “Terrible”, who took the guns to the relief of Ladysmith. The snake was carried in an empty ammunition box and fed on mice.
Given by – Surgeon Captain Brednall.”
This snake, seemingly kept as a kind of pet aboard the ship and fed with mice, offers an interesting look into the lives of sailors at sea.
Whether they sought out a snake for the purpose of pest control on board or simply happened upon it during their relief efforts in Ladysmith is unclear. Certainly, someone felt the snake important enough to preserve it after its death.
This is a typical example of reptile taxidermy, where the animal is skinned, and the skin alone is mounted onto a moulded plaster core.
However, due to the cartoonish face of the snake and the unnatural folds in the skin where the body bends, this appears to be an amateur example of taxidermy.
Prior to treatment the advice of a conservator more experienced with reptile taxidermy was sought. Due to the huge variety of objects in the museum’s collection, conservators are occasionally faced with objects or materials that they haven’t treated before.
Seeking the advice of colleagues is also a great way to collaborate both between departments and further afield. Fran Ritchie, Conservator for the National Park Service in the United States, was a key source of information for this project as she works with taxidermy specimens on a regular basis.
Once the snake was cleaned and loose scales secured, the most intensive phase of treatment could begin. Due to the significant damage to the skin and the plaster on the snake’s head and neck, treatments needed to offer stability and improve the appearance of the object.
Image of the large crack at the base of the snake’s neck; damage to the plaster has also caused the skin to tear and lift like this in multiple places
Pulp made from Japanese tissue paper, a conservation-grade pH neutral paper, was saturated with a consolidant and carefully inserted into any cracks in the plaster. This replaced any lost plaster, stopped the neck from wobbling, and offered increased support to the head.
The areas filled with this consolidant and paper pulp mix were also smoothed out so that the losses to the skin could be filled on top.
Image of the top of the snake’s head before (left) and after (right) infilling with the supportive paper pulp mixture
Once the cracks in the plaster were stabilised and filled, the aesthetic part of the treatment began.
Due to the high variation of colour and shape of the snake’s scales, painting all the missing scales individually on to a plain fill would take many hours. The decision was instead made to test a method that could save a lot of this time and potentially provide a far more successful visual fill.
This method involves printing images of intact areas of the snake skin on to Japanese tissue paper, a conservation-grade material often used in paper and leather repairs. Luckily, this is not an entirely new method so there was already some groundwork in place. Aisling Macken, Textile Conservator at Royal Museums Greenwich, has previously used a similar method to print facsimile ribbons for war medals on to silk. These ‘copy’ ribbons can then be attached over the original ribbons to protect them from light exposure, so that they don’t fade over time.
During Aisling’s work, the printer inks were already Oddy tested, which meant that they did not need to be tested again for this treatment. Oddy testing is a method of testing materials to see if they are safe to use in the treatment or display of an object. It was initially surprising that our printer inks passed Oddy testing but means that readily available equipment can be used to replicate this method in most conservation studios.
During the planning phase of the treatment Fran Ritchie, Conservator at the National Park Service, was contacted for advice in treating reptile taxidermy. Fran had previously used printed Japanese tissue fills for repairs on a rattlesnake and suggested this as a treatment method for the puff adder.
3. Copies of each shot are made in different colour variations, made using digital photo editing tools.
Printing on to more porous materials such as Japanese tissue paper can affect how the colour of the image translates, so colour variations were created so different options would be available. The snake also had natural variation across its body, so the colour is different in different areas.
This image shows the range in colours of the printed snake skin achieved with simple digital editing.
A sheet of Japanese tissue paper was attached to a sheet of standard printer paper using double-sided tape. This acts as a support for the thinner tissue paper during printing:
This method was very successful at reducing the need for significant inpainting and achieved a very convincing fill even before minor inpainting. During the application of the printed fills, localised humidification was also used to reduce the brittleness of areas of skin that were lifting so that they could be adhered back down.
Where areas of loss were surrounded by lifting skin, the fill was adhered with edges slightly under the original skin to achieve a more seamless appearance when the skin was adhered back down.
Image of the proper right side of the base of the snake’s neck before treatment (left) and after humidification and application of the printed fill (right)
In some areas, it was necessary to be even more delicate. On the tail a larger fill was still obvious and visible, so individual scales were carefully cut out from the printed sheets and adhered in place individually to reduce the appearance of cracks in the tail.
The snake is still undergoing the final stages of treatment, involving minor touch-ups with paints and the production of a new storage box to maintain its stability long-term.
Even though the treatment is not completed, however, the condition of the snake has already been vastly improved.
Rebecca Summerour, The Examination of Conservation of a Snake Skin Suit Jacket (ANAGPIC: 2012)
Nicole Passerotti, Rebecca Summerour, Fran Ritchie, and Susan Heald, Creating Faux Quillwork with Digital Printing (Smithsonian: 2015)
